

Chrome Background Page Identity Api Scope Continuously Running
Protecting an API using Client Credentials
Welcome to the first quickstart for IdentityServer! To see the full list of quickstarts, please see Quickstarts Overview.
This first quickstart provides step by step instructions to set up IdentityServer in the most basic scenario: protecting APIs for server-to-server communication. You will create a solution containing three projects:
- An Identity Server
- An API that requires authentication
- A client that accesses that API
The client will request an access token from IdentityServer using its client ID and secret and then use the token to gain access to the API.
Source Code
As with all of the quickstarts, you can find the source code for it in the Samples repository. The project for this quickstart is Quickstart #1: Securing an API using Client Credentials.
Preparation
The IdentityServer templates for the dotnet CLI are a good starting point for the quickstarts. To install the templates open a console window and type the following command:
dotnet new --install Duende.IdentityServer.Templates Create the Solution and IdentityServer Project
In this section, you will create a directory for the solution and use the isempty (IdentityServer Empty) template to create an ASP.NET Core application that includes a basic IdentityServer setup.
mkdir quickstart cd quickstart dotnet new sln -n Quickstart mkdir src cd src dotnet new isempty -n IdentityServer This will create the following files:
- IdentityServer.csproj - project file
- Properties/launchSettings.json file - launch profile
- appsettings.json - run time settings
- Program.cs - main application entry point
- HostingExtensions.cs - configuration for ASP.NET pipeline and services. Notably, the IdentityServer services are configured here and the IdentityServer middleware is added to the pipeline here.
- Config.cs - definitions for resources and clients used by IdentityServer
You can now use your favorite text editor to edit or view the files.
Add the IdentityServer project to the solution:
cd .. dotnet sln add ./src/IdentityServer/IdentityServer.csproj The protocol used in this template is https and the port is set to 5001. You can change the port in the Properties/launchSettings.json file. For production scenarios you should always use https.
Defining an API Scope
Scope is a core feature of OAuth that allows you to express the extent or scope of access. Clients request scopes when they initiate the protocol, declaring what scope of access they want. IdentityServer then has to decide which scopes to include in the token. Just because the client has asked for something doesn't mean they should get it! There are built-in abstractions as well as extensibility points that you can use to make this decision. Ultimately, IdentityServer issues a token to the client, which then uses the token to access APIs. APIs can check the scopes that were included in the token to make authorization decisions.
Scopes don't have structure imposed by the protocols - they are just space-separated strings. This allows for flexibility when designing the scopes used by a system. In this quickstart, you will create a scope that represents complete access to your API.
Scope definitions can be loaded in many ways. This quickstart shows how to use a "code as configuration" approach. A minimal Config.cs was created by the template. Open it and add an ApiScope to the ApiScopes property:
public static IEnumerable<ApiScope> ApiScopes => new List<ApiScope> { new ApiScope(name: "api1", displayName: "MyAPI") }; See the full file here.
In production it is important to give your API a useful name and display name. Use these names to describe your API in simple terms to both developers and users. Developers will use the name to connect to your API, and end users will see the display name on consent screens, etc.
Defining the client
The next step is to configure a client application that you will use to access the API.
In this quickstart, the client will not have an interactive user and will authenticate with IdentityServer using a client secret.
Add this client definition to Config.cs:
public static IEnumerable<Client> Clients => new List<Client> { new Client { ClientId = "client", // no interactive user, use the clientid/secret for authentication AllowedGrantTypes = GrantTypes.ClientCredentials, // secret for authentication ClientSecrets = { new Secret("secret".Sha256()) }, // scopes that client has access to AllowedScopes = { "api1" } } }; Again, see the full file here.
Clients can be configured with many options. Your minimal machine-to-machine client here contains
- A ClientId, which identifies the application to IdentityServer so that it knows which client is trying to connect to it.
- A Secret, which you can think of as the password for the client.
- The list of scopes that the client is allowed to ask for.
Notice that the allowed scope here matches the name of the ApiScope above.
Configuring IdentityServer
The scope and client definitions are loaded in HostingExtensions.cs. The template created a ConfigureServices method there that is already loading the scopes and clients. You can take a look to see how it is done. Note that the template adds a few things that are not used in this quickstart. Here's the minimal ConfigureServices method that is needed:
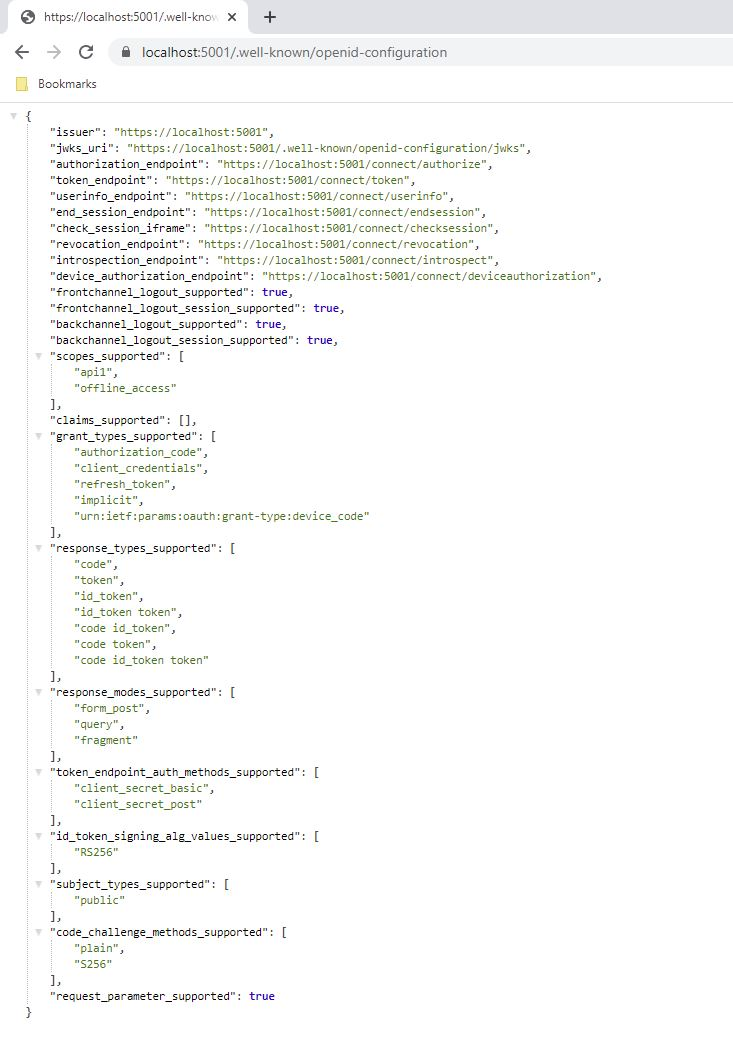
public static WebApplication ConfigureServices(this WebApplicationBuilder builder) { builder.Services.AddIdentityServer() .AddInMemoryApiScopes(Config.ApiScopes) .AddInMemoryClients(Config.Clients); return builder.Build(); } That's it - your IdentityServer is now configured. If you run the project and then navigate to https://localhost:5001/.well-known/openid-configuration in your browser, you should see the discovery document. The discovery document is a standard endpoint in OpenID Connect and OAuth. It is used by your clients and APIs to retrieve configuration data needed to request and validate tokens, login and logout, etc.
On first startup, IdentityServer will use its automatic key management feature to create a signing key and store it in the keys folder. To avoid accidentally disclosing cryptographic secrets, the entire keys folder should be excluded from source control. It will be recreated if it is not present.
Create an API Project
Next, add an API project to your solution. This API will serve protected resources that will be secured by IdentityServer.
You can either use the ASP.NET Core Web API template from Visual Studio or use the .NET CLI to create the API project. To use the CLI, run the following command from the quickstart/src folder:
dotnet new webapi -n Api Then add it to the solution by running the following commands:
cd .. dotnet sln add ./src/Api/Api.csproj Add JWT Bearer Authentication
Now we will add JWT Bearer Authentication to the API's ASP.NET pipeline. We want to authenticate users of our API using tokens issued by the IdentityServer project. To that end, we will add authentication middleware to the pipeline from the Microsoft.AspNetCore.Authentication.JwtBearer nuget package. This middleware will
- Find and parse a JWT sent with incoming requests as an Authorization: Bearer header.
- Validate the JWT's signature to ensure that it was issued by IdentityServer.
- Validate that the JWT is not expired.
Run this command in the quickstart directory to install the middleware package:
dotnet add ./src/Api/Api.csproj package Microsoft.AspNetCore.Authentication.JwtBearer Now add JWT Bearer authentication services to the Service Collection to allow for dependency injection (DI), and configure Bearer as the default Authentication Scheme.
builder.Services.AddAuthentication("Bearer") .AddJwtBearer("Bearer", options => { options.Authority = "https://localhost:5001"; options.TokenValidationParameters = new TokenValidationParameters { ValidateAudience = false }; }); Audience validation is disabled here because access to the api is modeled with ApiScopes only. By default, no audience will be emitted unless the api is modeled with ApiResources instead. See here for a more in-depth discussion.
Add authentication middleware to the pipeline immediately before authorization:
app.UseAuthentication(); app.UseAuthorization(); UseAuthentication adds the authentication middleware to the pipeline so authentication will be performed automatically on every call into the host. UseAuthorization adds the authorization middleware to make sure our API endpoint cannot be accessed by anonymous clients.
Add a controller
Add a new class called IdentityController:
[Route("identity")] [Authorize] public class IdentityController : ControllerBase { [HttpGet] public IActionResult Get() { return new JsonResult(from c in User.Claims select new { c.Type, c.Value }); } } This controller will be used to test authorization and to visualize the claims identity through the eyes of the API. See the full file here.
Configure API to listen on Port 6001
Configure the API to run on https://localhost:6001 only. You can do this by editing the launchSettings.json file inside the Properties folder. Change the application URL setting to be:
"applicationUrl" : "https://localhost:6001" Test the controller
Run the API project and then navigate to the identity controller at https://localhost:6001/identity in a browser. This should return a 401 status code, which means your API requires a credential and is now protected by IdentityServer.
Create the client project
The last step is to create a client that requests an access token and then uses that token to access the API. Your client will be a console project in your solution. From the quickstart/src directory, run the following command:
dotnet new console -n Client Then as before, add it to your solution using:
cd .. dotnet sln add ./src/Client/Client.csproj Add the IdentityModel nuget package
The token endpoint at IdentityServer implements the OAuth protocol, and you could use raw HTTP to access it. However, we have a client library called IdentityModel that encapsulates the protocol interaction in an easy to use API.
Add the IdentityModel NuGet package to your client. This can be done either via Visual Studio's Nuget Package manager or dotnet CLI. From the quickstart directory, run the following command:
dotnet add ./src/Client/Client.csproj package IdentityModel Retrieve the discovery document
IdentityModel includes a client library to use with the discovery endpoint. This way you only need to know the base address of IdentityServer - the actual endpoint addresses can be read from the metadata. Add the following to the client's Program.cs:
// discover endpoints from metadata var client = new HttpClient(); var disco = await client.GetDiscoveryDocumentAsync("https://localhost:5001"); if (disco.IsError) { Console.WriteLine(disco.Error); return; } If you get an error connecting it may be that you are running https and the development certificate for localhost is not trusted. You can run dotnet dev-certs https --trust in order to trust the development certificate. This only needs to be done once.
Request a token from IdentityServer
Next you can use the information from the discovery document to request a token from IdentityServer to access api1:
// request token var tokenResponse = await client.RequestClientCredentialsTokenAsync(new ClientCredentialsTokenRequest { Address = disco.TokenEndpoint, ClientId = "client", ClientSecret = "secret", Scope = "api1" }); if (tokenResponse.IsError) { Console.WriteLine(tokenResponse.Error); return; } Console.WriteLine(tokenResponse.AccessToken); Copy and paste the access token from the console to jwt.ms to inspect the raw token.
Calling the API
To send the access token to the API you typically use the HTTP Authorization header. This is done using the SetBearerToken extension method:
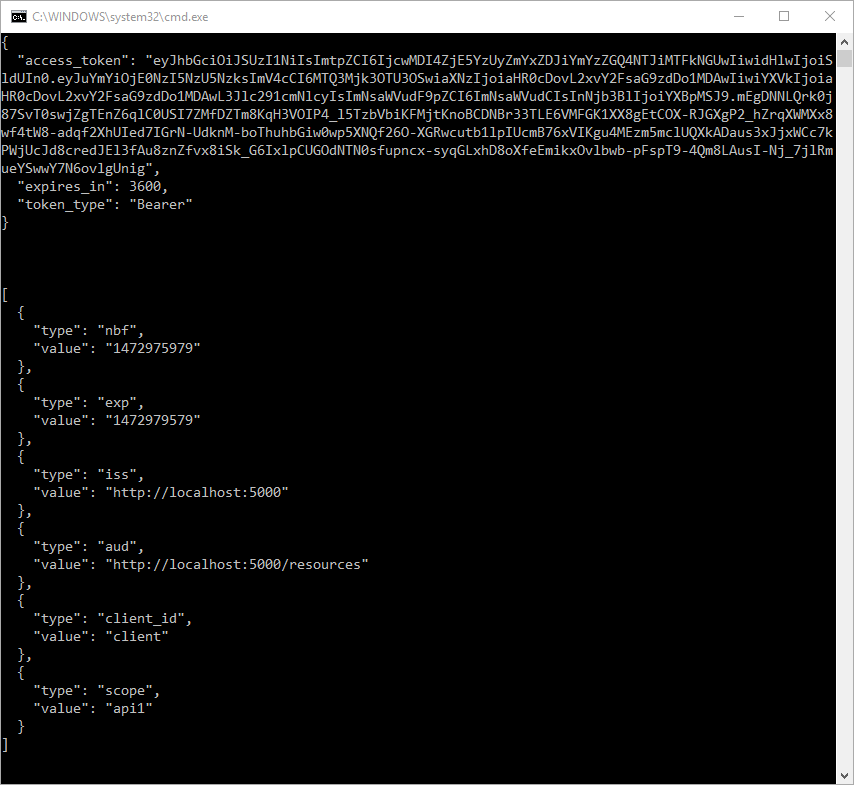
// call api var apiClient = new HttpClient(); apiClient.SetBearerToken(tokenResponse.AccessToken); var response = await apiClient.GetAsync("https://localhost:6001/identity"); if (!response.IsSuccessStatusCode) { Console.WriteLine(response.StatusCode); } else { var doc = JsonDocument.Parse(await response.Content.ReadAsStringAsync()).RootElement; Console.WriteLine(JsonSerializer.Serialize(doc, new JsonSerializerOptions { WriteIndented = true })); } The completed Program.cs file can be found here.
To test the flow, start the IdentityServer and API projects. Once they are running, run the Client project.
The output should look like this:
If you're using Visual Studio, here's how to start everything up:
- Right click the solution and select Set Startup Projects
- Choose Multiple Startup Projects and set the action for Api and IdentityServer to Start
- Run the solution and wait a moment for both the API and and IdentityServer to start
- Right click the Client project and select Debug… Start New Instance.
By default an access token will contain claims about the scope, lifetime (nbf and exp), the client ID (client_id) and the issuer name (iss).
Right now, the API accepts any access token issued by your IdentityServer. In this section, you will add an Authorization Policy to the API that will check for the presence of the "api1" scope in the access token. The protocol ensures that this scope will only be in the token if the client requests it and IdentityServer allows the client to have that scope. You configured IdentityServer to allow this access by including it in the allowedScopes property. Add the following to the ConfigureServices method in the API's Program.cs file:
builder.Services.AddAuthorization(options => { options.AddPolicy("ApiScope", policy => { policy.RequireAuthenticatedUser(); policy.RequireClaim("scope", "api1"); }); }); You can now enforce this policy at various levels, e.g.:
- globally
- for all API endpoints
- for specific controllers/actions
Typically you set the policy for all controllers where they are mapped in Api\Program.cs:
app.MapControllers().RequireAuthorization("ApiScope"); Further experiments
This quickstart focused on the success path:
- The client was able to request a token.
- The client could use the token to access the API.
You can now try to provoke errors to learn how the system behaves, e.g.:
- Try to connect to IdentityServer when it is not running (unavailable).
- Try to use an invalid client id or secret to request the token.
- Try to ask for an invalid scope during the token request.
- Try to call the API when it is not running (unavailable).
- Don't send the token to the API.
- Configure the API to require a different scope than the one in the token.
Source: https://docs.duendesoftware.com/identityserver/v6/quickstarts/1_client_credentials/
0 Response to "Chrome Background Page Identity Api Scope Continuously Running"
ارسال یک نظر